How to add a new project
Adding a project is a pretty simple but very important step. You can either import all the information, check here how, or you can follow the next steps:
- Go to Management section from menu.
- Click on the Add button from the bottom right corner.
- Choose the option – Add project.
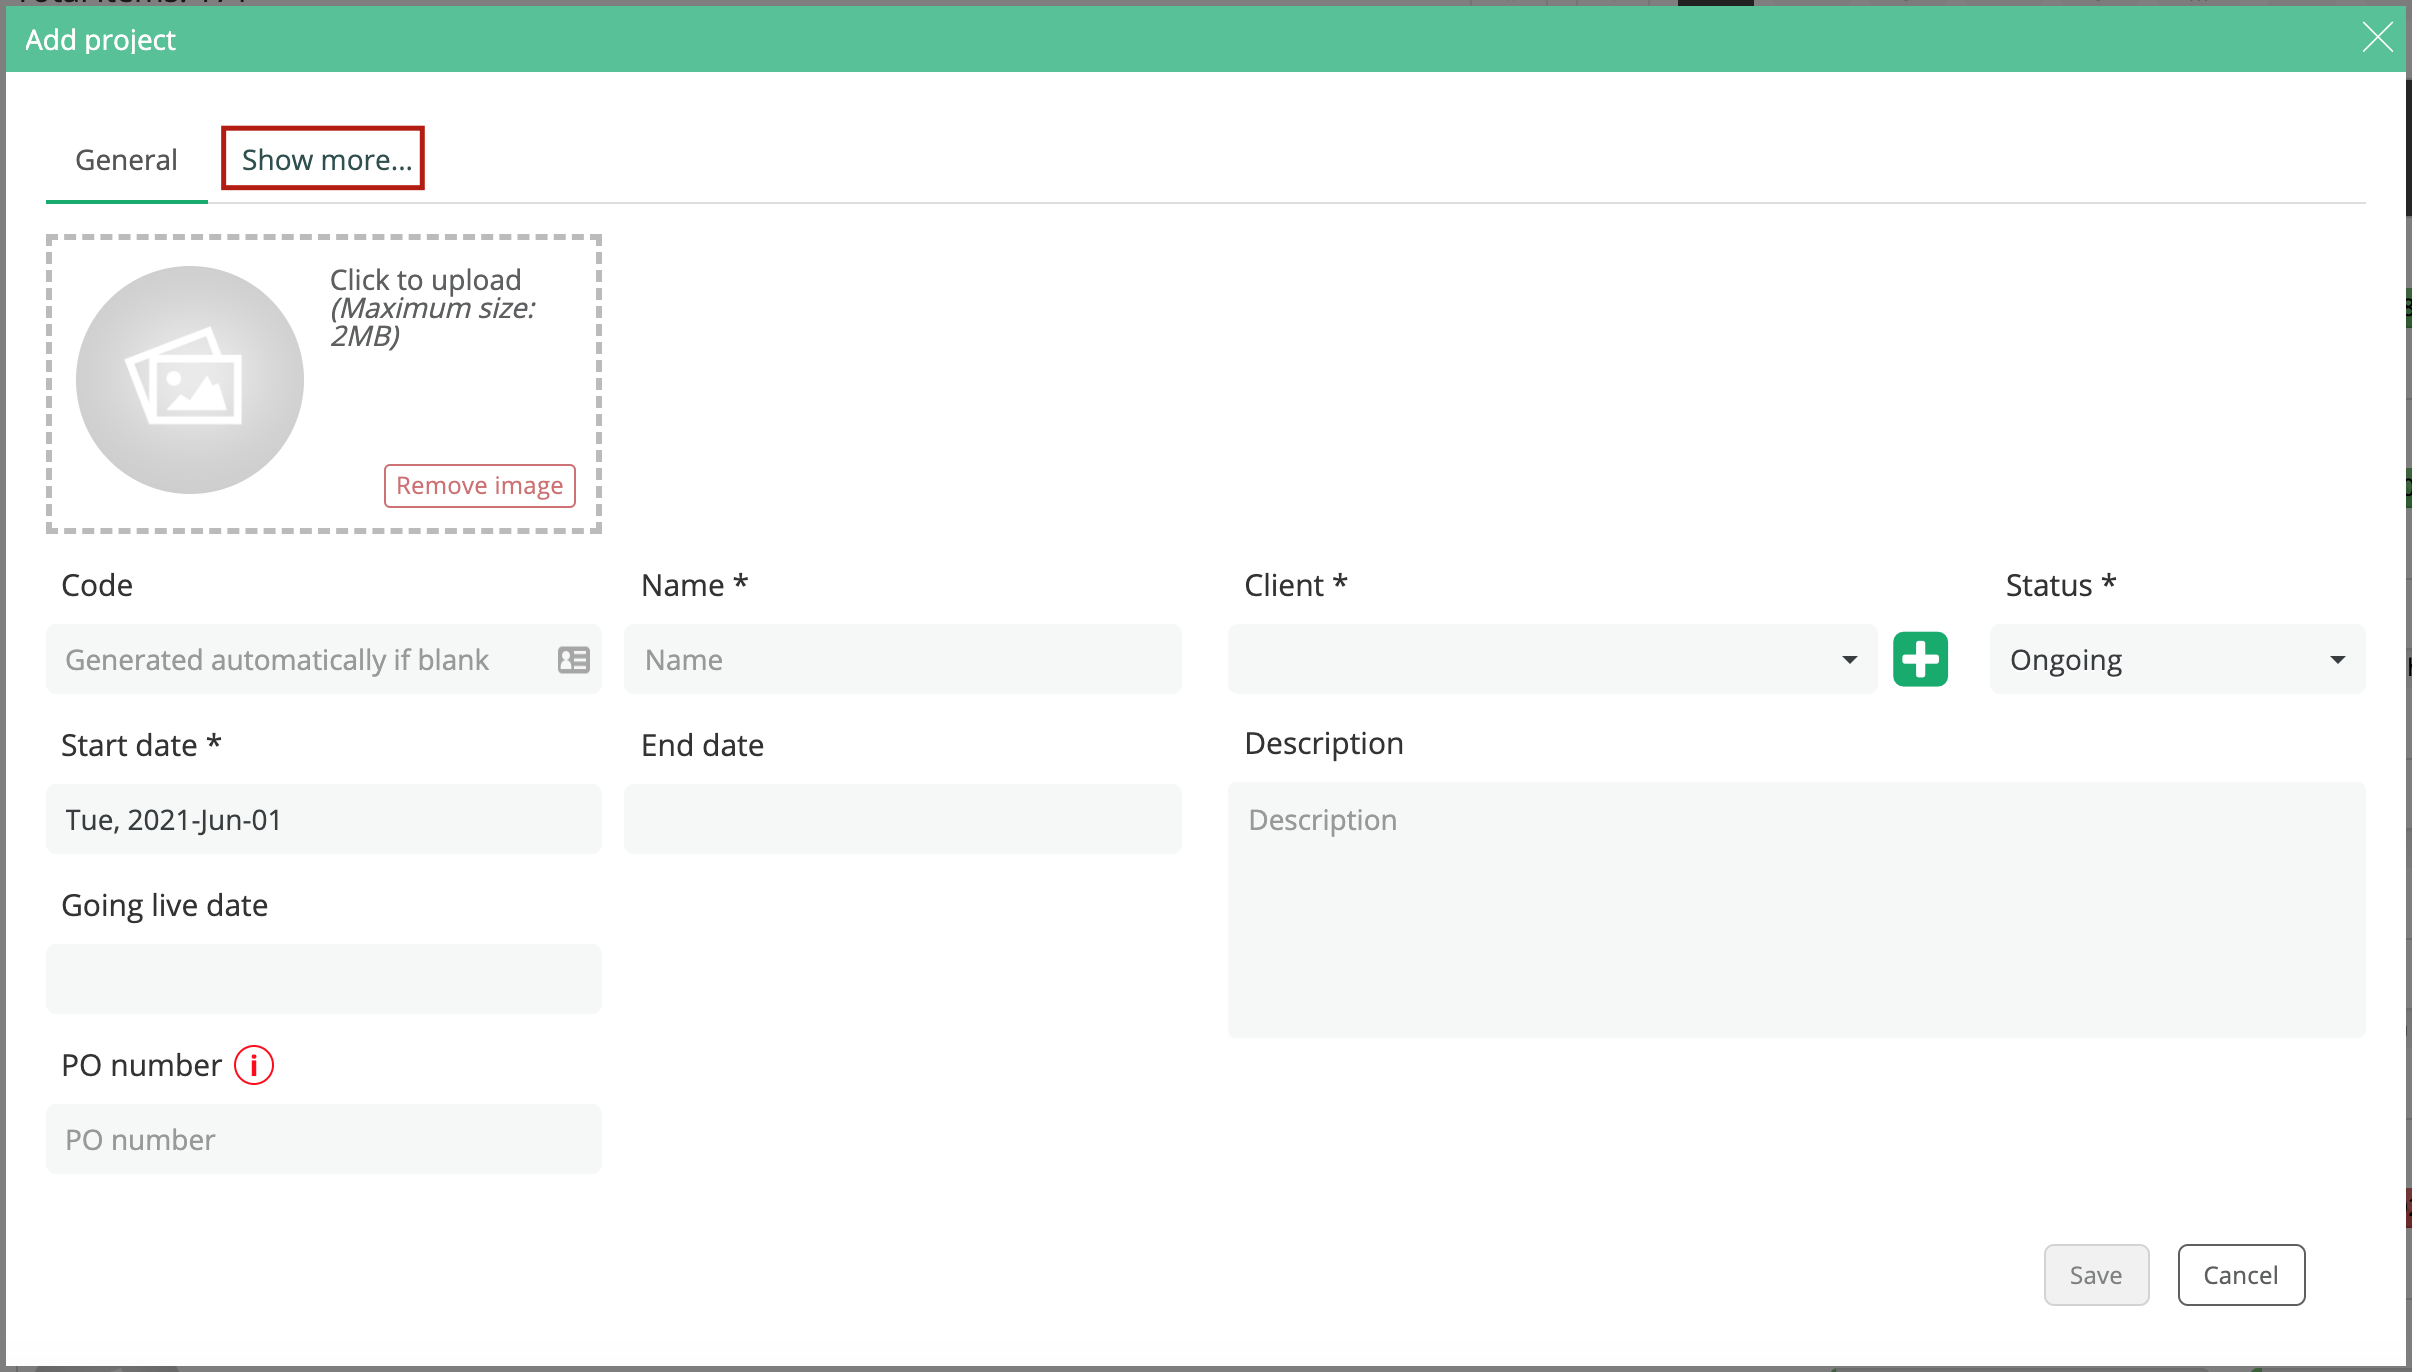
At first you will have a view where you will have to add most of the mandatory information, in the “General” tab, starting with the Logo, where you can either drag and drop an image or you ca import the logo or any picture that you will assign for the project, so that it is easily recognisable in the list of projects:
1.GENERAL
The “General” tab has fields that are mandatory to be filled in like Name, Client, Status and Start date, all the other fields are not mandatory but the information will be useful for different reports and charts:
- End date:
- Description: Add any other information you want about the project
- Going live date: The date when the project will have to be up and running.
- PO number: Purchase Order number from the Client
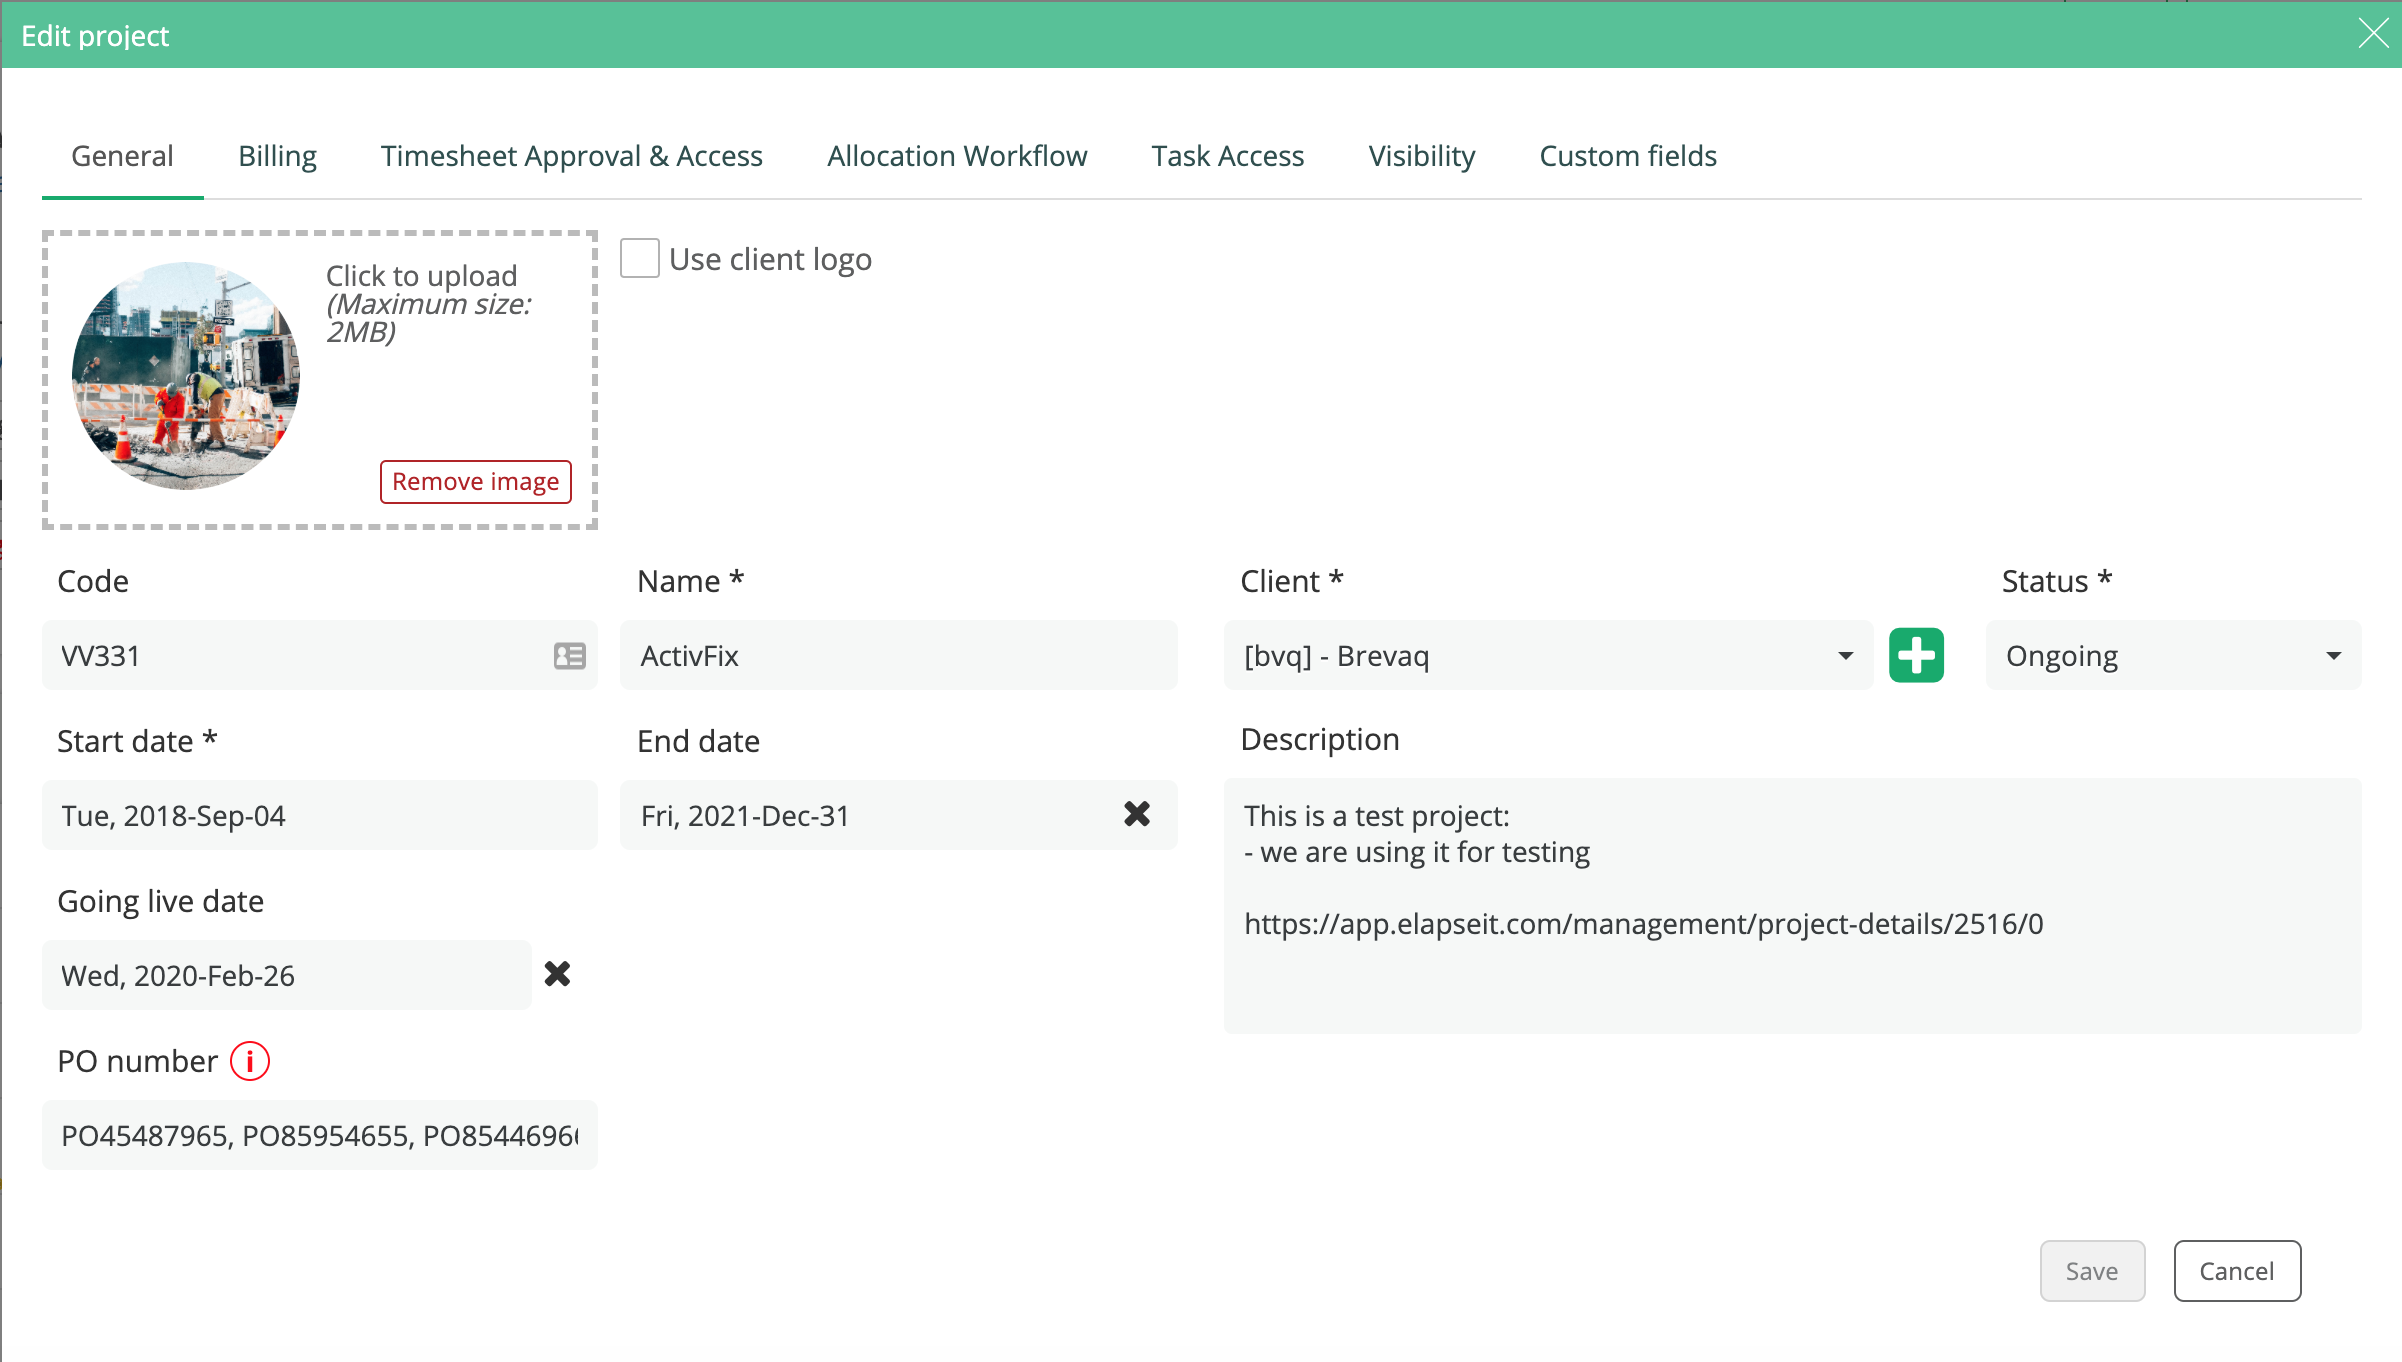
After the general information is filled in, click on “Show more…” and make the specific settings for this project by adding budgets, rates, set how the project should be seen by all the users who will have access to it, etc
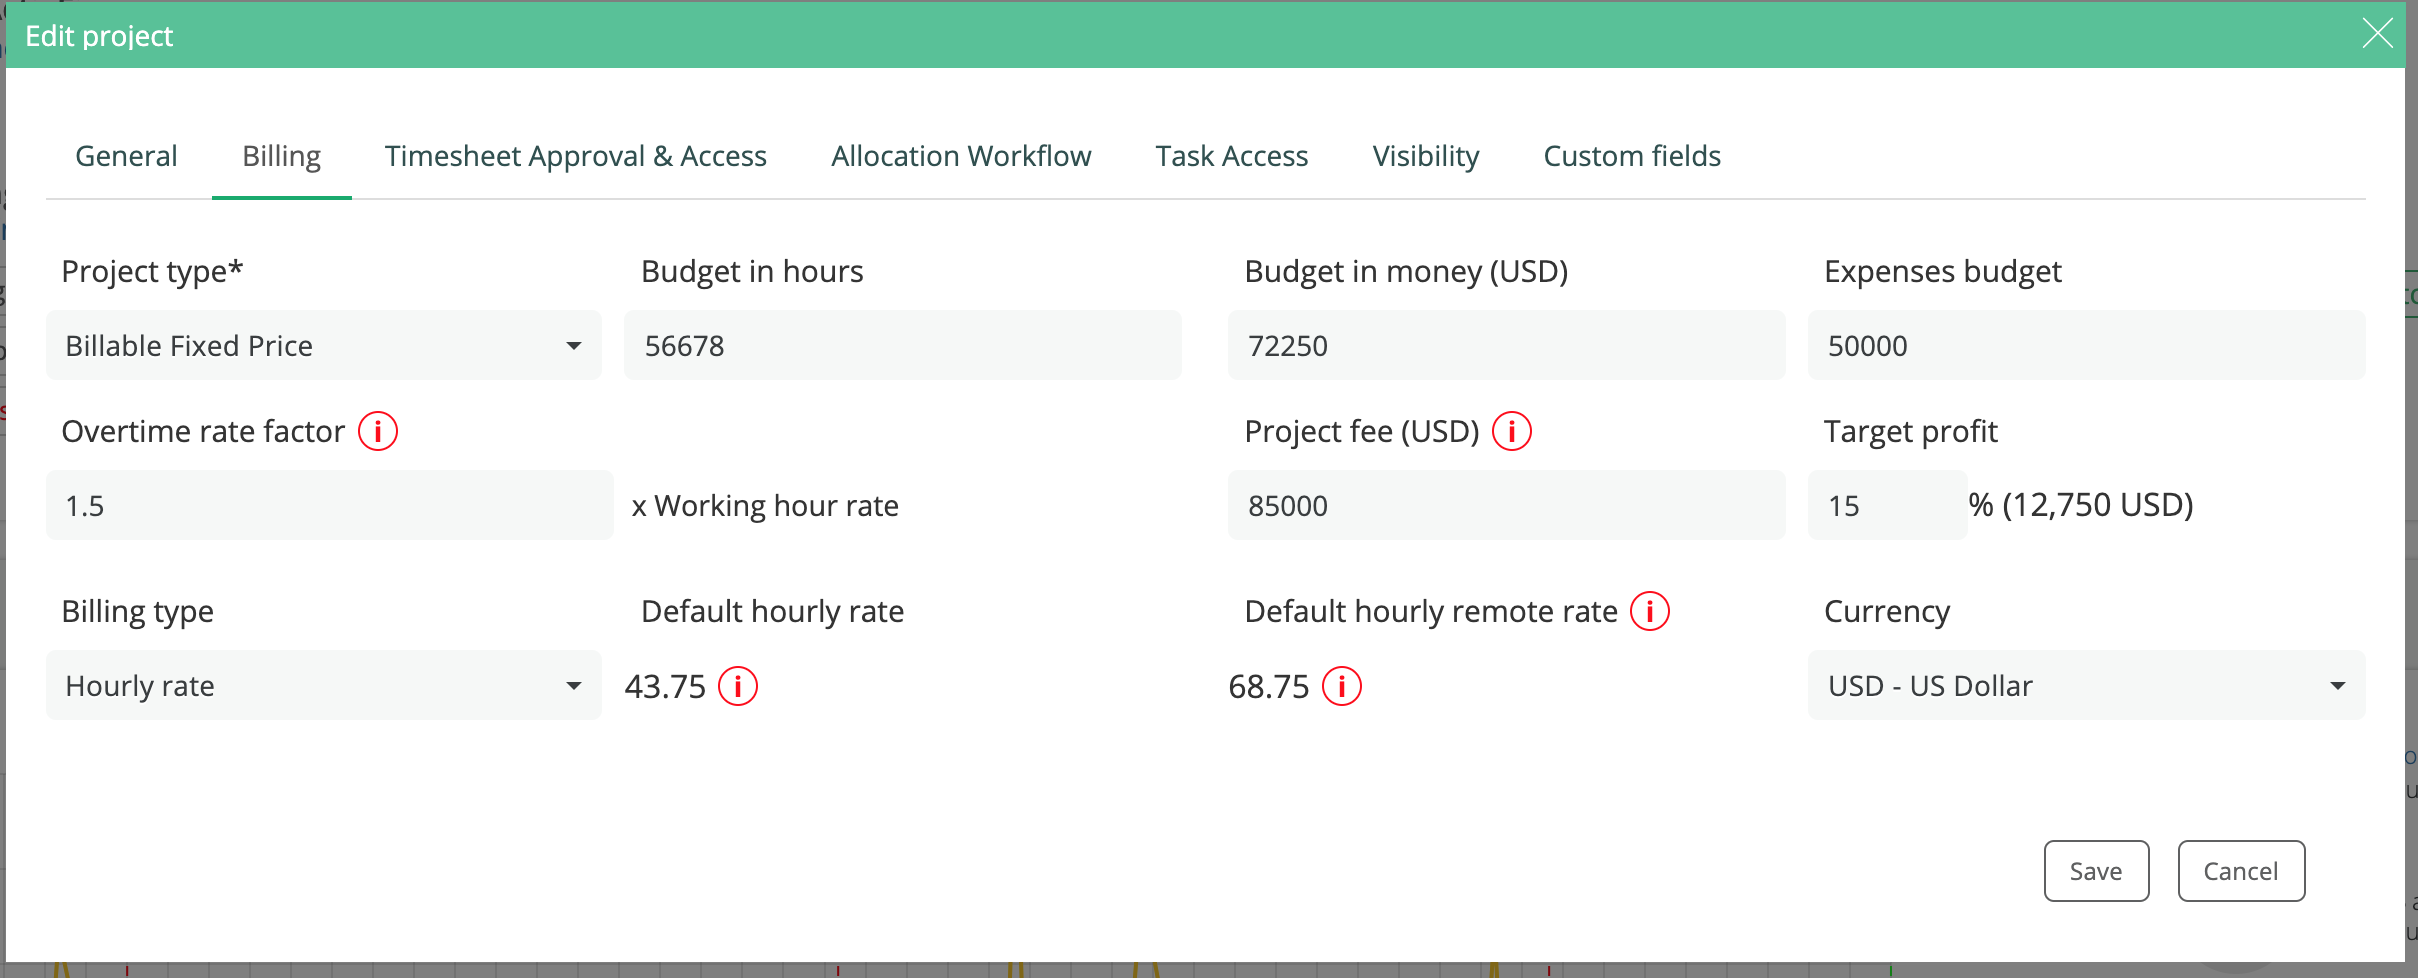
2. BILLING
In the “Billing” tab is a lot of non-mandatory information that is used in calculating reports, statistics and for invoicing the client.
First, and the only mandatory information here is to set the “Project type“, for which you have 3 alternatives:
- Billable Fixed price – no matter how many hours you work or what any other spendings you might have, for the project, you have to respect the agreed budget.
- Billable Time and Materials – there is no fixed budget, you invoice your clients all the logged hours and any other expenses you might have on the project.
- Internal – non-billable project, used for internal projects for which you still want to see some reports and statistics although you do not invoice it further.
The Overtime rate factor is how you calculate the cost for the overtime that you want to invoice your client, at a different hourly rate than the one set for the project. As you will see in the app, by clicking on the “red i”, the hourly rate will be multiplied with the rate factor that you choose (in the example below, with 1.5).
Adding a Target profit, for the project, is only possible if the project type is “Billable Fixed Price”. The simplest way to use this feature is to add the percentage of the profit you target, add the “Project fee” which is the actual budget you will invoice your client (the budget your agree upon with your client) and, automatically, the “Budget in money” will be calculated. Budget in money represents the budget that remains for the project after you “take out” the sum that you target at profit.
For each project you can decide if it will be billed in hours (hourly rate) or in days (daily rate). After you set the rate, all the changes that will be done will be available as history.
3. TIMESHEET APPROVAL & ACCESS
Considering that the timesheet is populated automatically with the hours in the resourcing planner, you can choose if for your project, as a project manager, you want for the submitted hours to come to you for approval (so the approval is done in 2 steps) or you want for all the hours that are submitted on your project to be automatically approved (1 step approval).
Another step is to decide who can log hours on your project. By default everybody ca log hours, but you can choose, for your projects, if only the people you allocate can log hours on your project, only the team members of the project (the team members can be set in Management/Projects view) can log hours, or both the mentioned categories.
By setting who can log hours on your project, you make your further job a lot easier and mistake free.

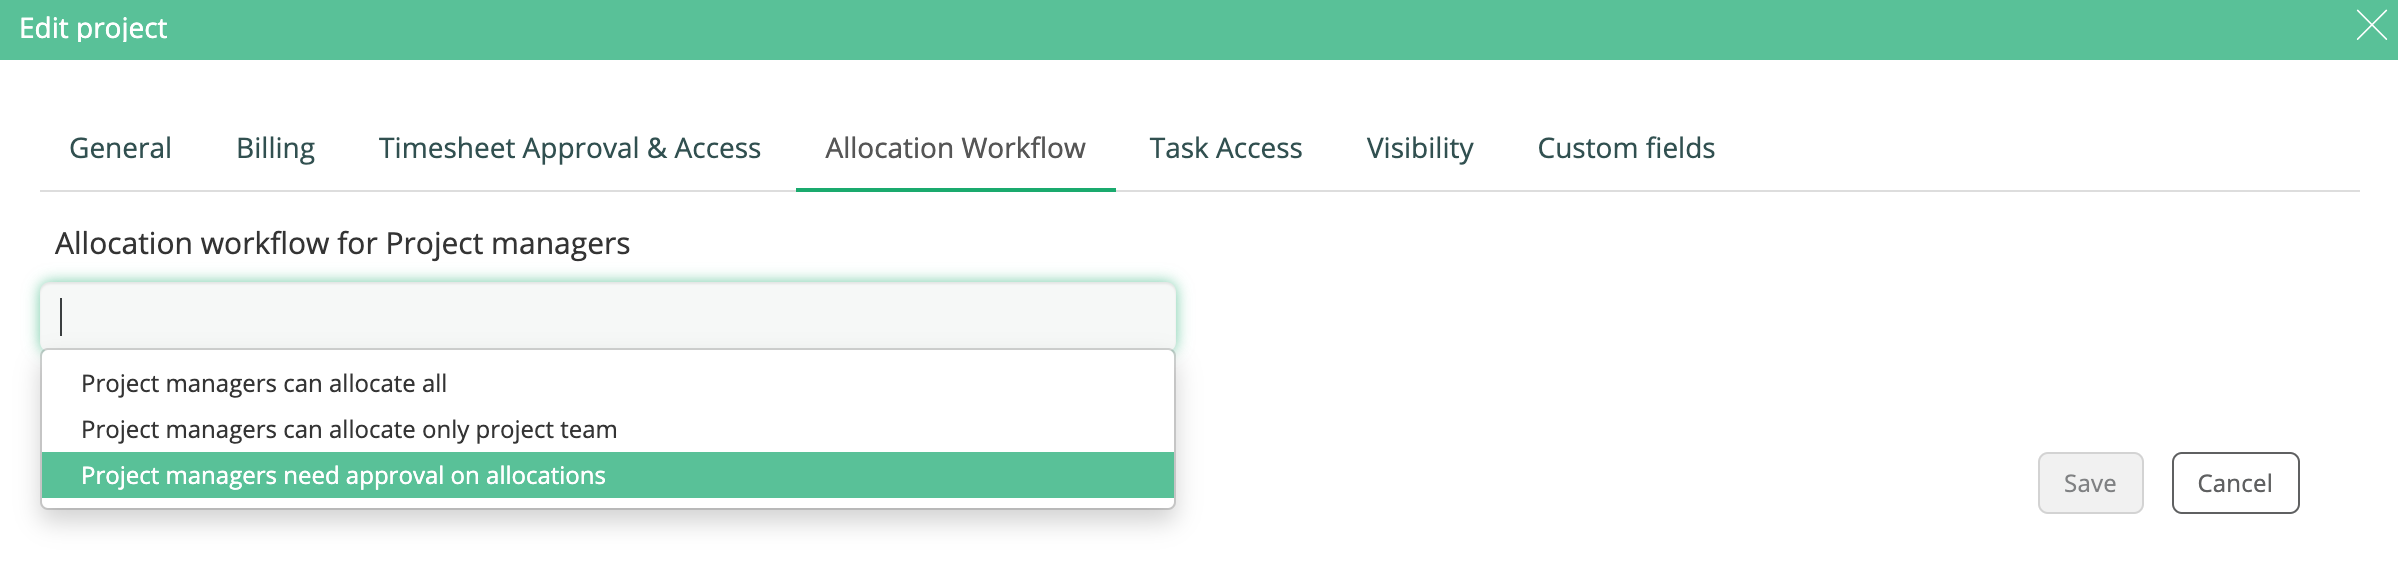
Depending on the way your company works, you have the possibility to set workflows for the project managers in every project. By default, the project manager of the new created project can allocate all the users in the app, but depending on your specific reasons, you can change that. You can decide if the project manager needs to allocate only the team members, to this project, or even more, you can set for the project manager to need approval for any allocation that is done on this specific project.
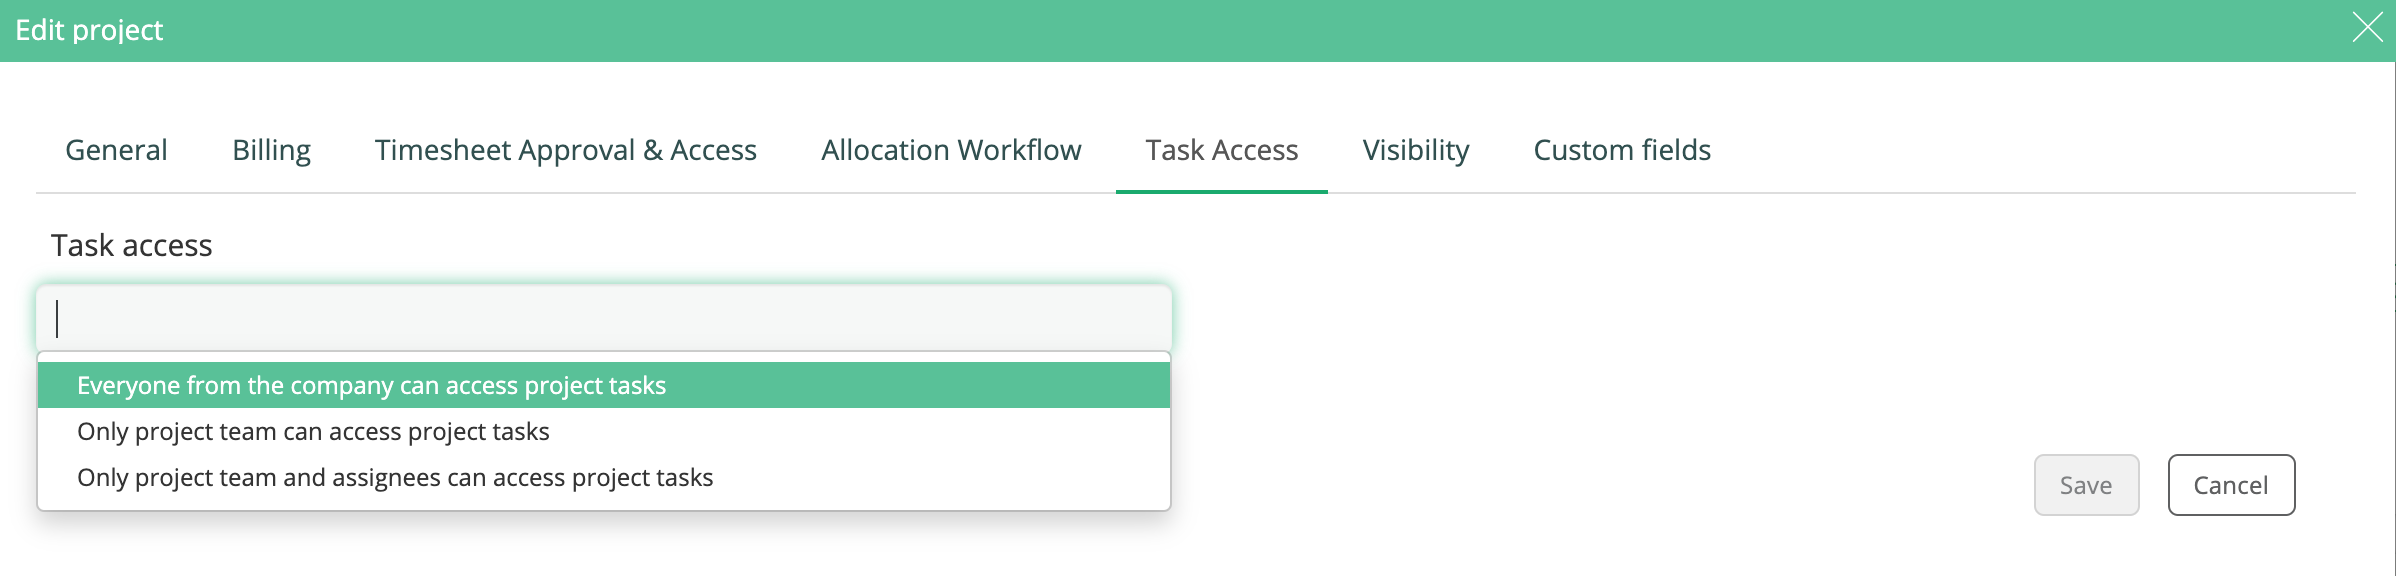
5. TASK ACCESS
The task management is very useful when you want to know, in details, everything that is done on your project, that is why you should also be aware about who has access to the task on the project. If you decide that only project team or project team and assignees should have access to the tasks of your project, all the other users will not be able to see any tasks created on this project.
6. VISIBILITY
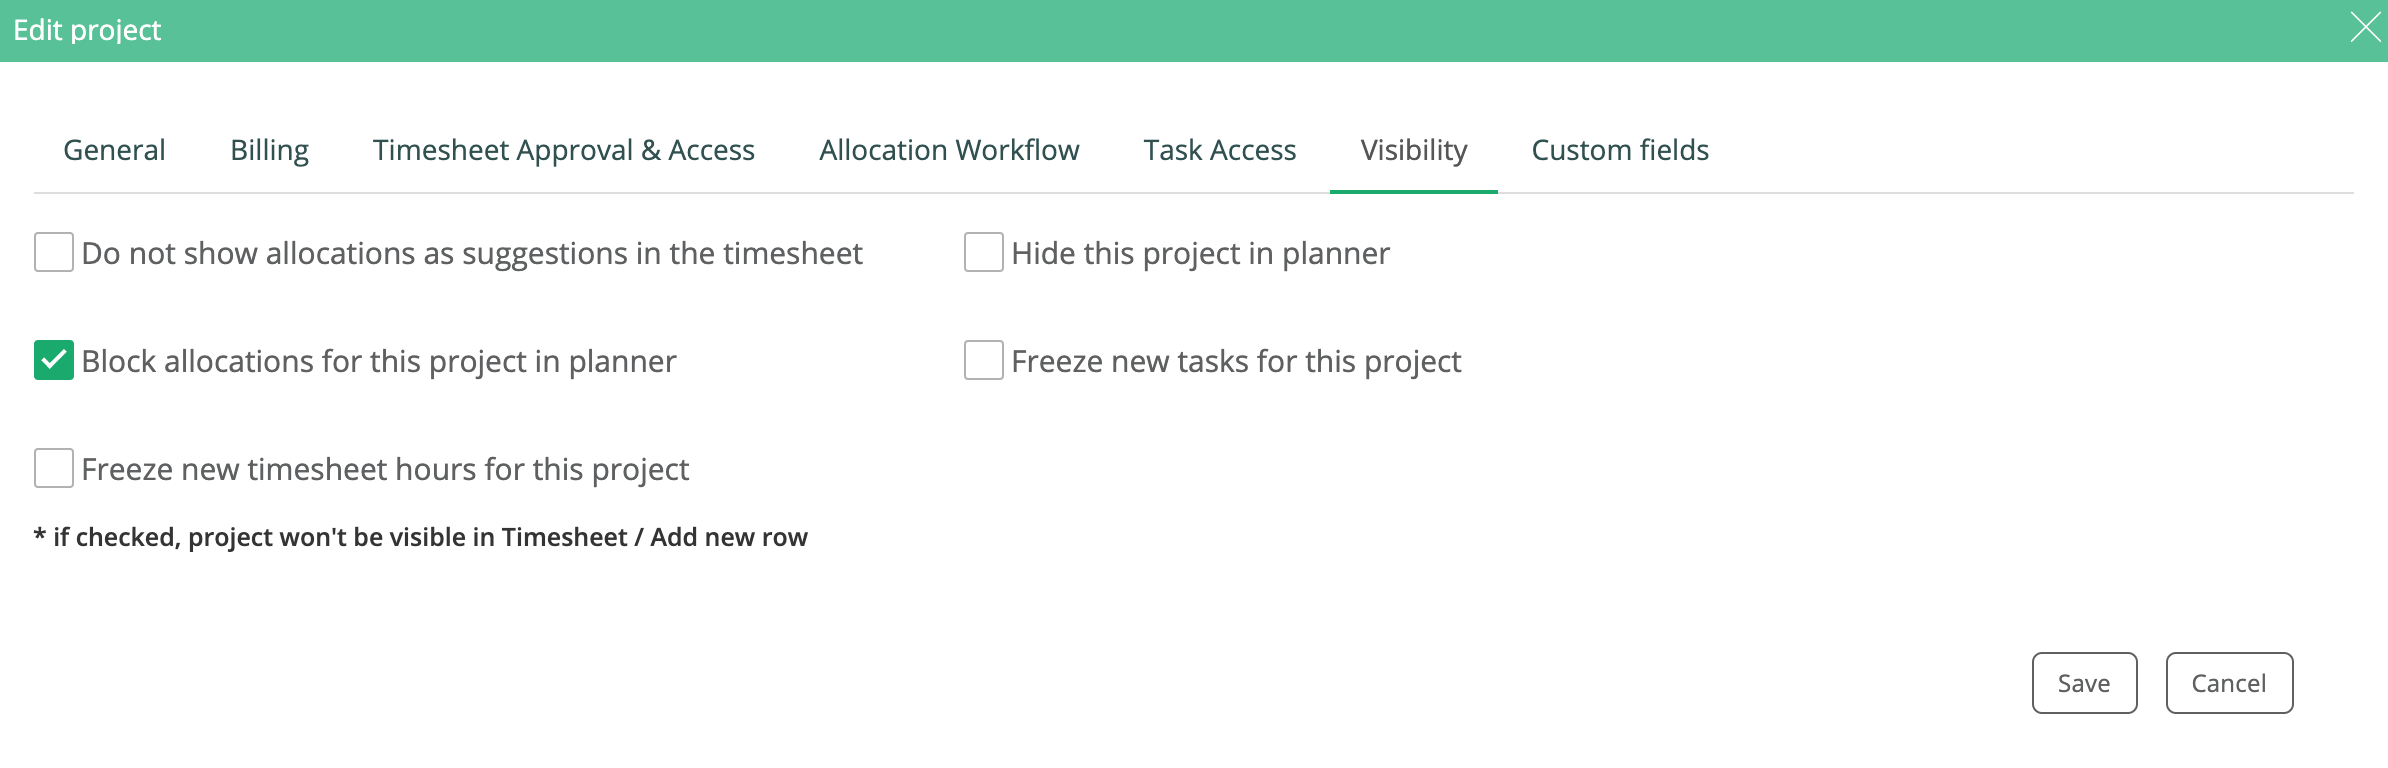
Working with a lot of project at a time, all with different statuses, sometimes you need to put some on hold, for a while and this is when the “Visibility” settings are more than useful. You can “block allocations in the planner” for this project, until status changes, more that this, you can even “hide” it from the planner, to not see a crowded planner with project that cannot work on for the moment. Maybe you don’t want to hide the project but you do not want new task to be created, so you “freeze new tasks”, or maybe “freeze new timesheet”, which will make the project invisible to be choses in timesheet, from Add new row.
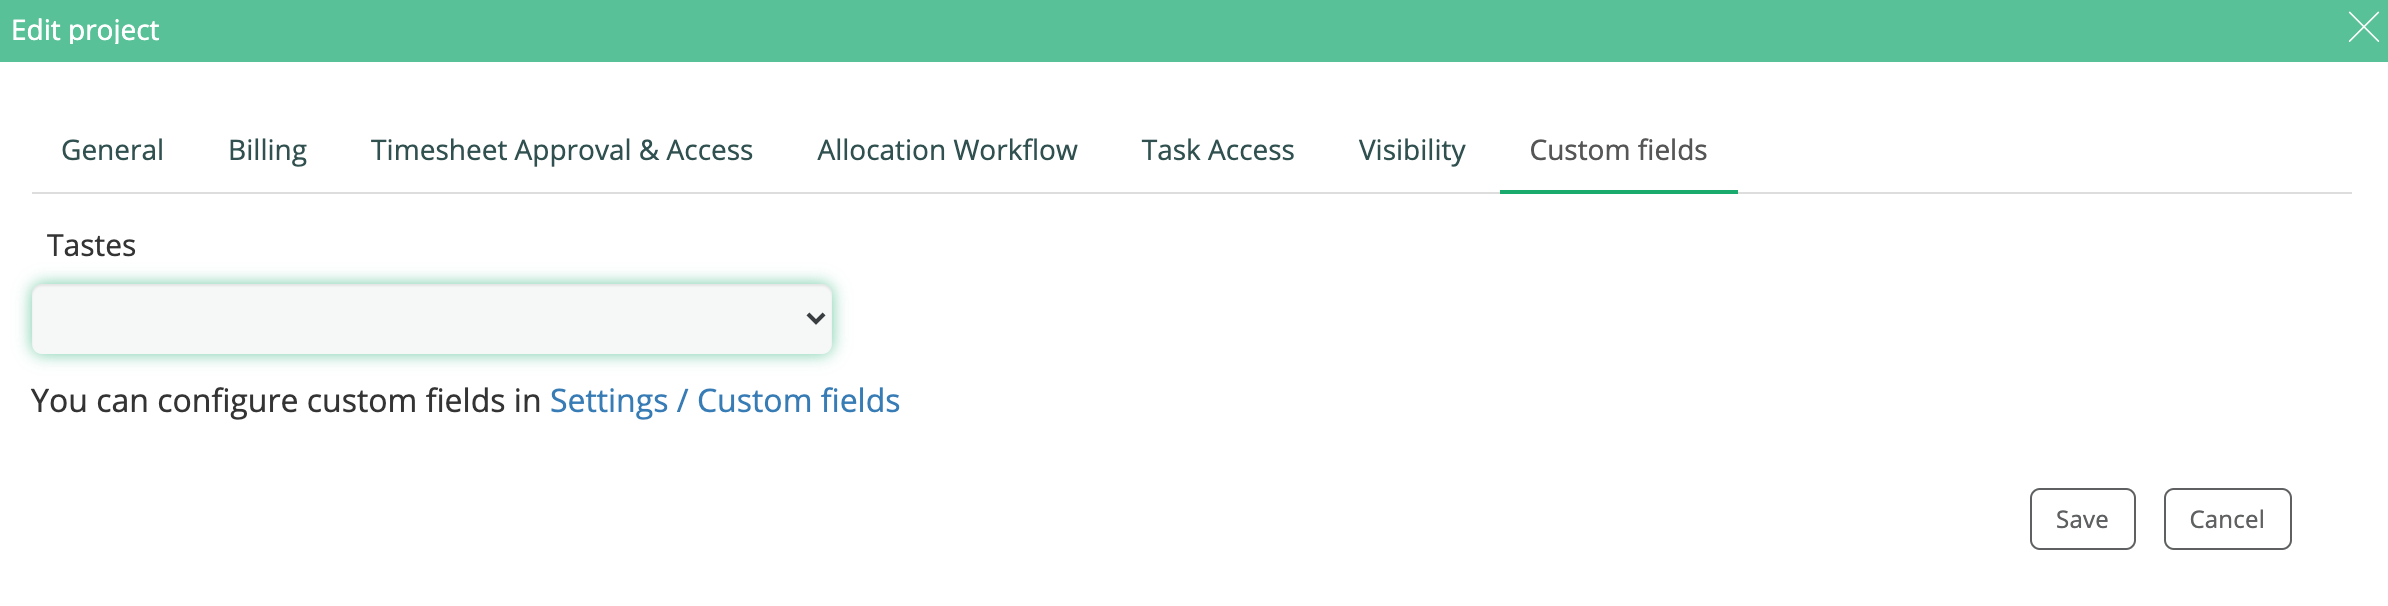
7. CUSTOM FIELDS
Although by adding a new project you have a lot of information to add, in case there are fields that you would like to be shown in the Project page, you can create them from Settings/Custom fields. They can be drop-down list, strings, numbers, etc
After creating the project and adding all the information that helps for accounting, reports, statistics, you can add all the information regarding the team, role rates, project managers and even allocate users from here.
8. TEAM
To create a team for the project, you go to Team tab and, using the green plus ,you will have a drop-down list with all the users in your account. After you choose the user, you can also choose the role that this user will have in this project.
You can also copy the team and the role rates from another existing project.

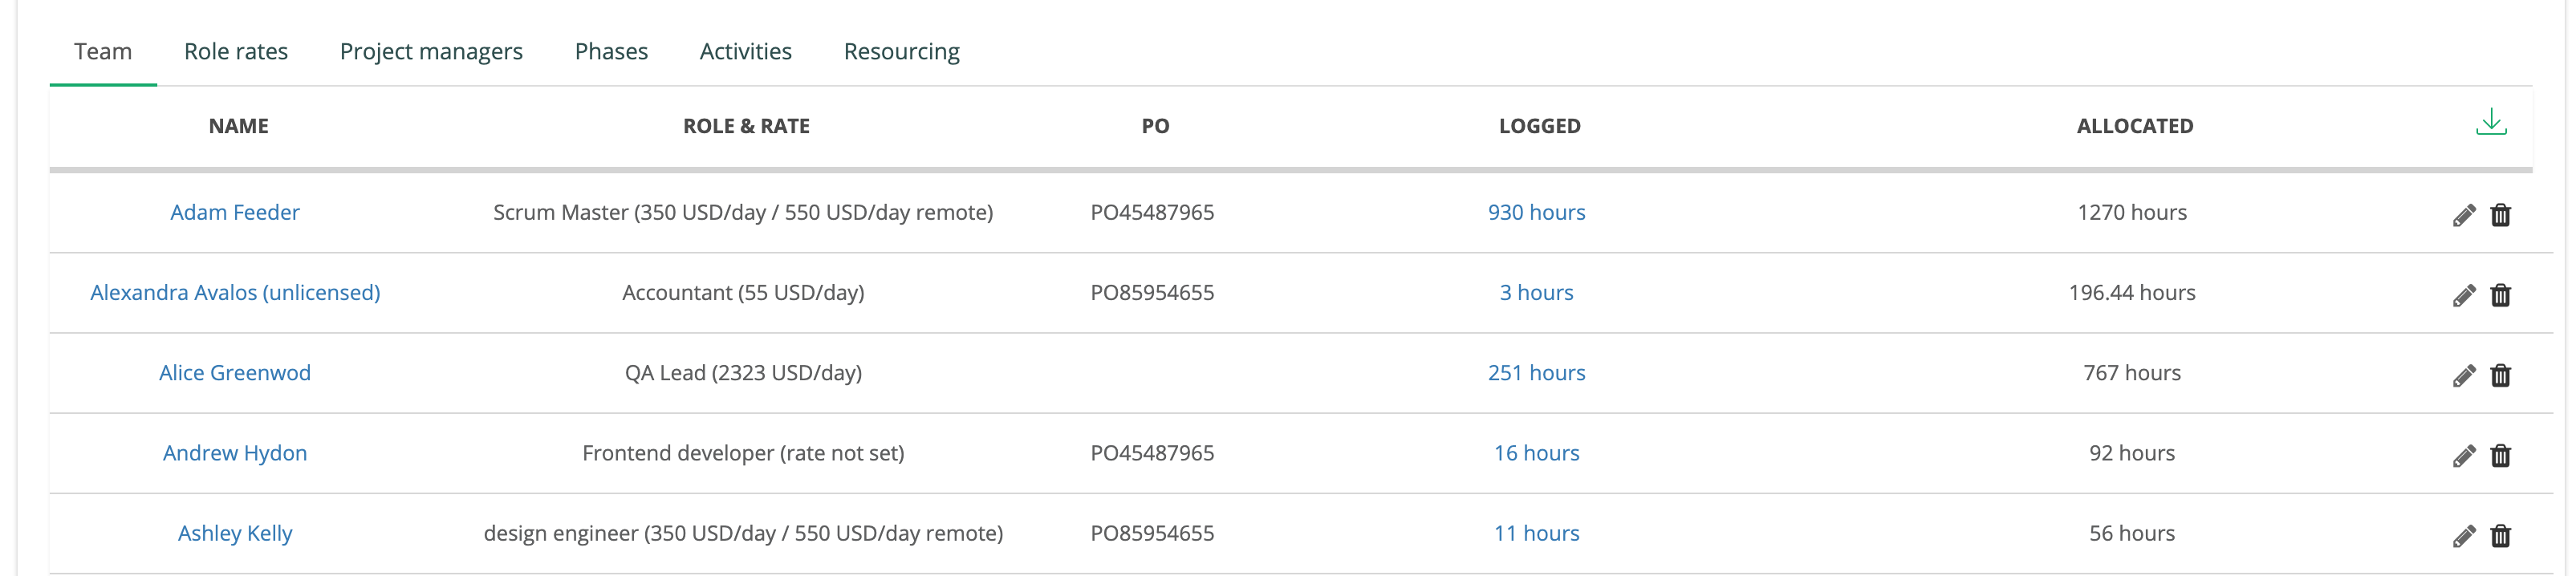
9. ROLE RATES
Although you add a default hourly rate for the project, in the Billing tab, you can also add a role hourly rate, which will overwrite the default hourly rate for al the submitted hours of this user (with this role).You can also copy the role rates from another existing project.
The rates can be set only by role, not by user, in the Project tab. You can add a hourly or daily rate, depending on how you set the project (in Billing tab), and you can also set an hourly/daily remote rate, used, in general for the hours logged by the user when the work was done remotely.
The history of the rates is kept and is used in reports accordingly.

10. PROJECT MANAGERS
Add 1 or more project manager for each project, depending on how big is the project and depending on the company policies.
Also, if you added Contacts in the Client tab, here, you can add them here also, if they are project managers for the project from the client side – in the drop-down list you will have a list with all the contacts from the client of this project, but you can only choose 1 PM.

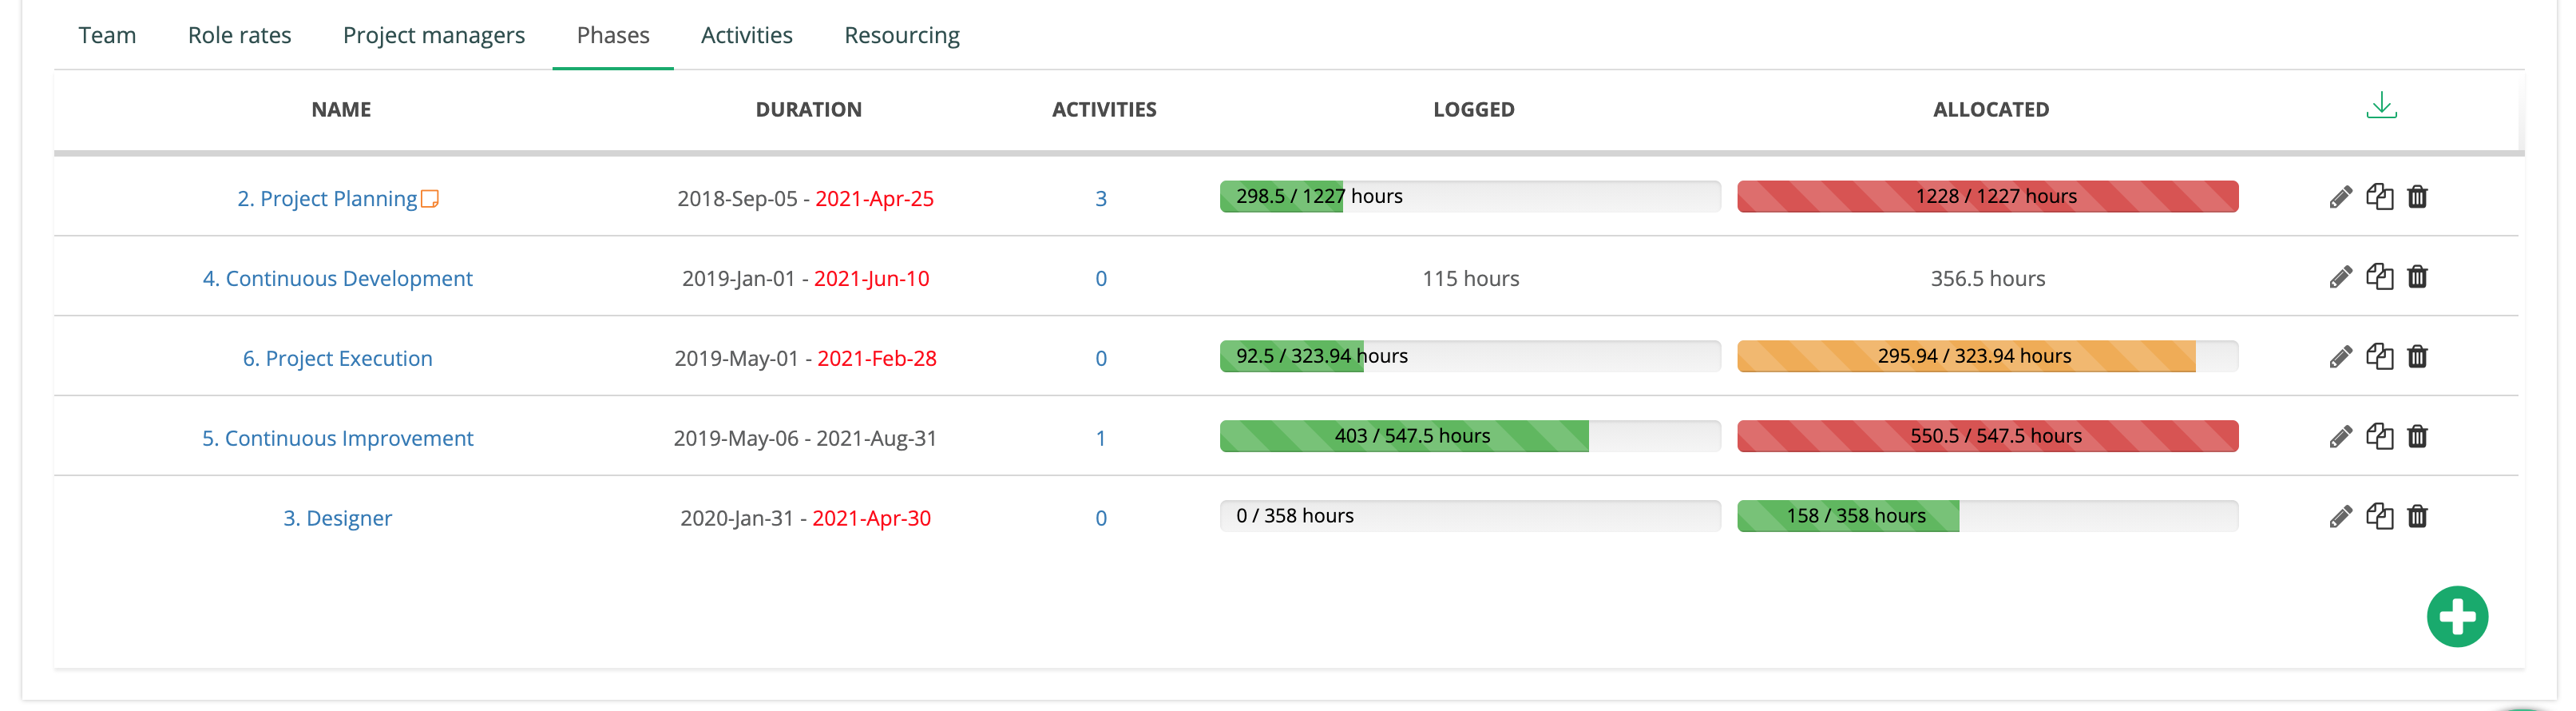
11. PHASES and ACTIVITIES
The projects, depending on their length, can be split in phases and activities (which can be part of a phase or self standing). The phases can have their budgets (part of the project budget) in money and/hours. Every phase needs a title, a start and an end date.
You can also copy the phases and/or activities from another existing project.
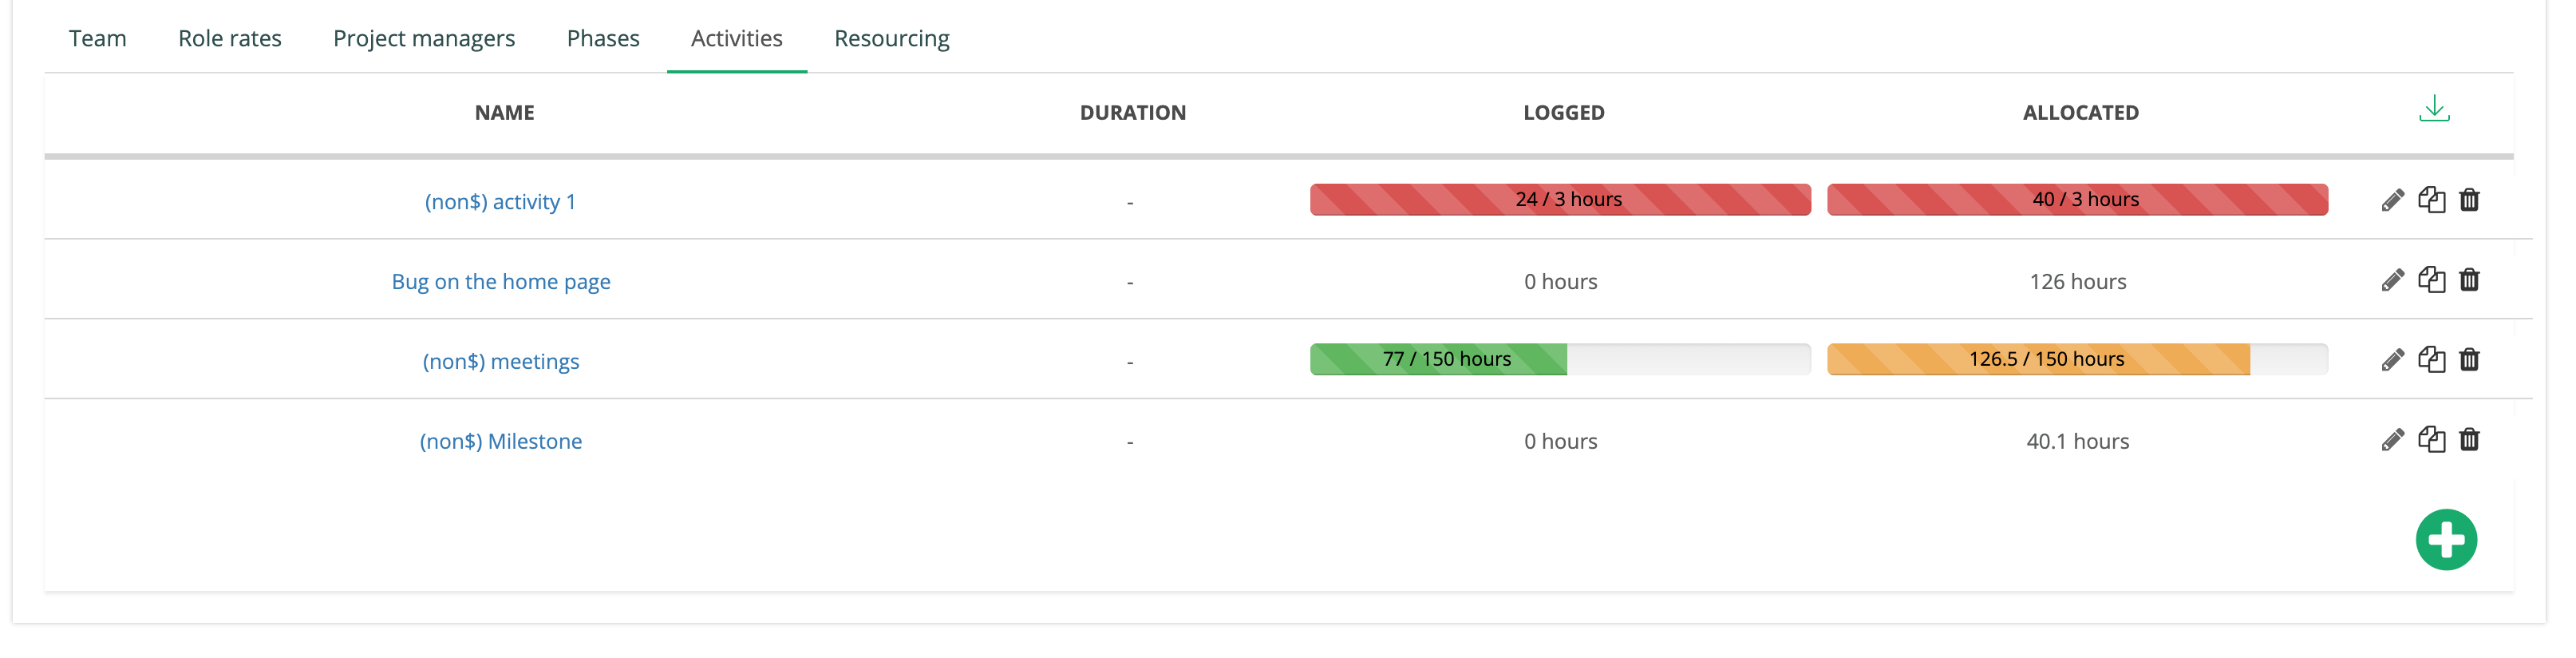
Each phase can have activities which act as even smaller phases (as length and budget – can be billable and non-billable).
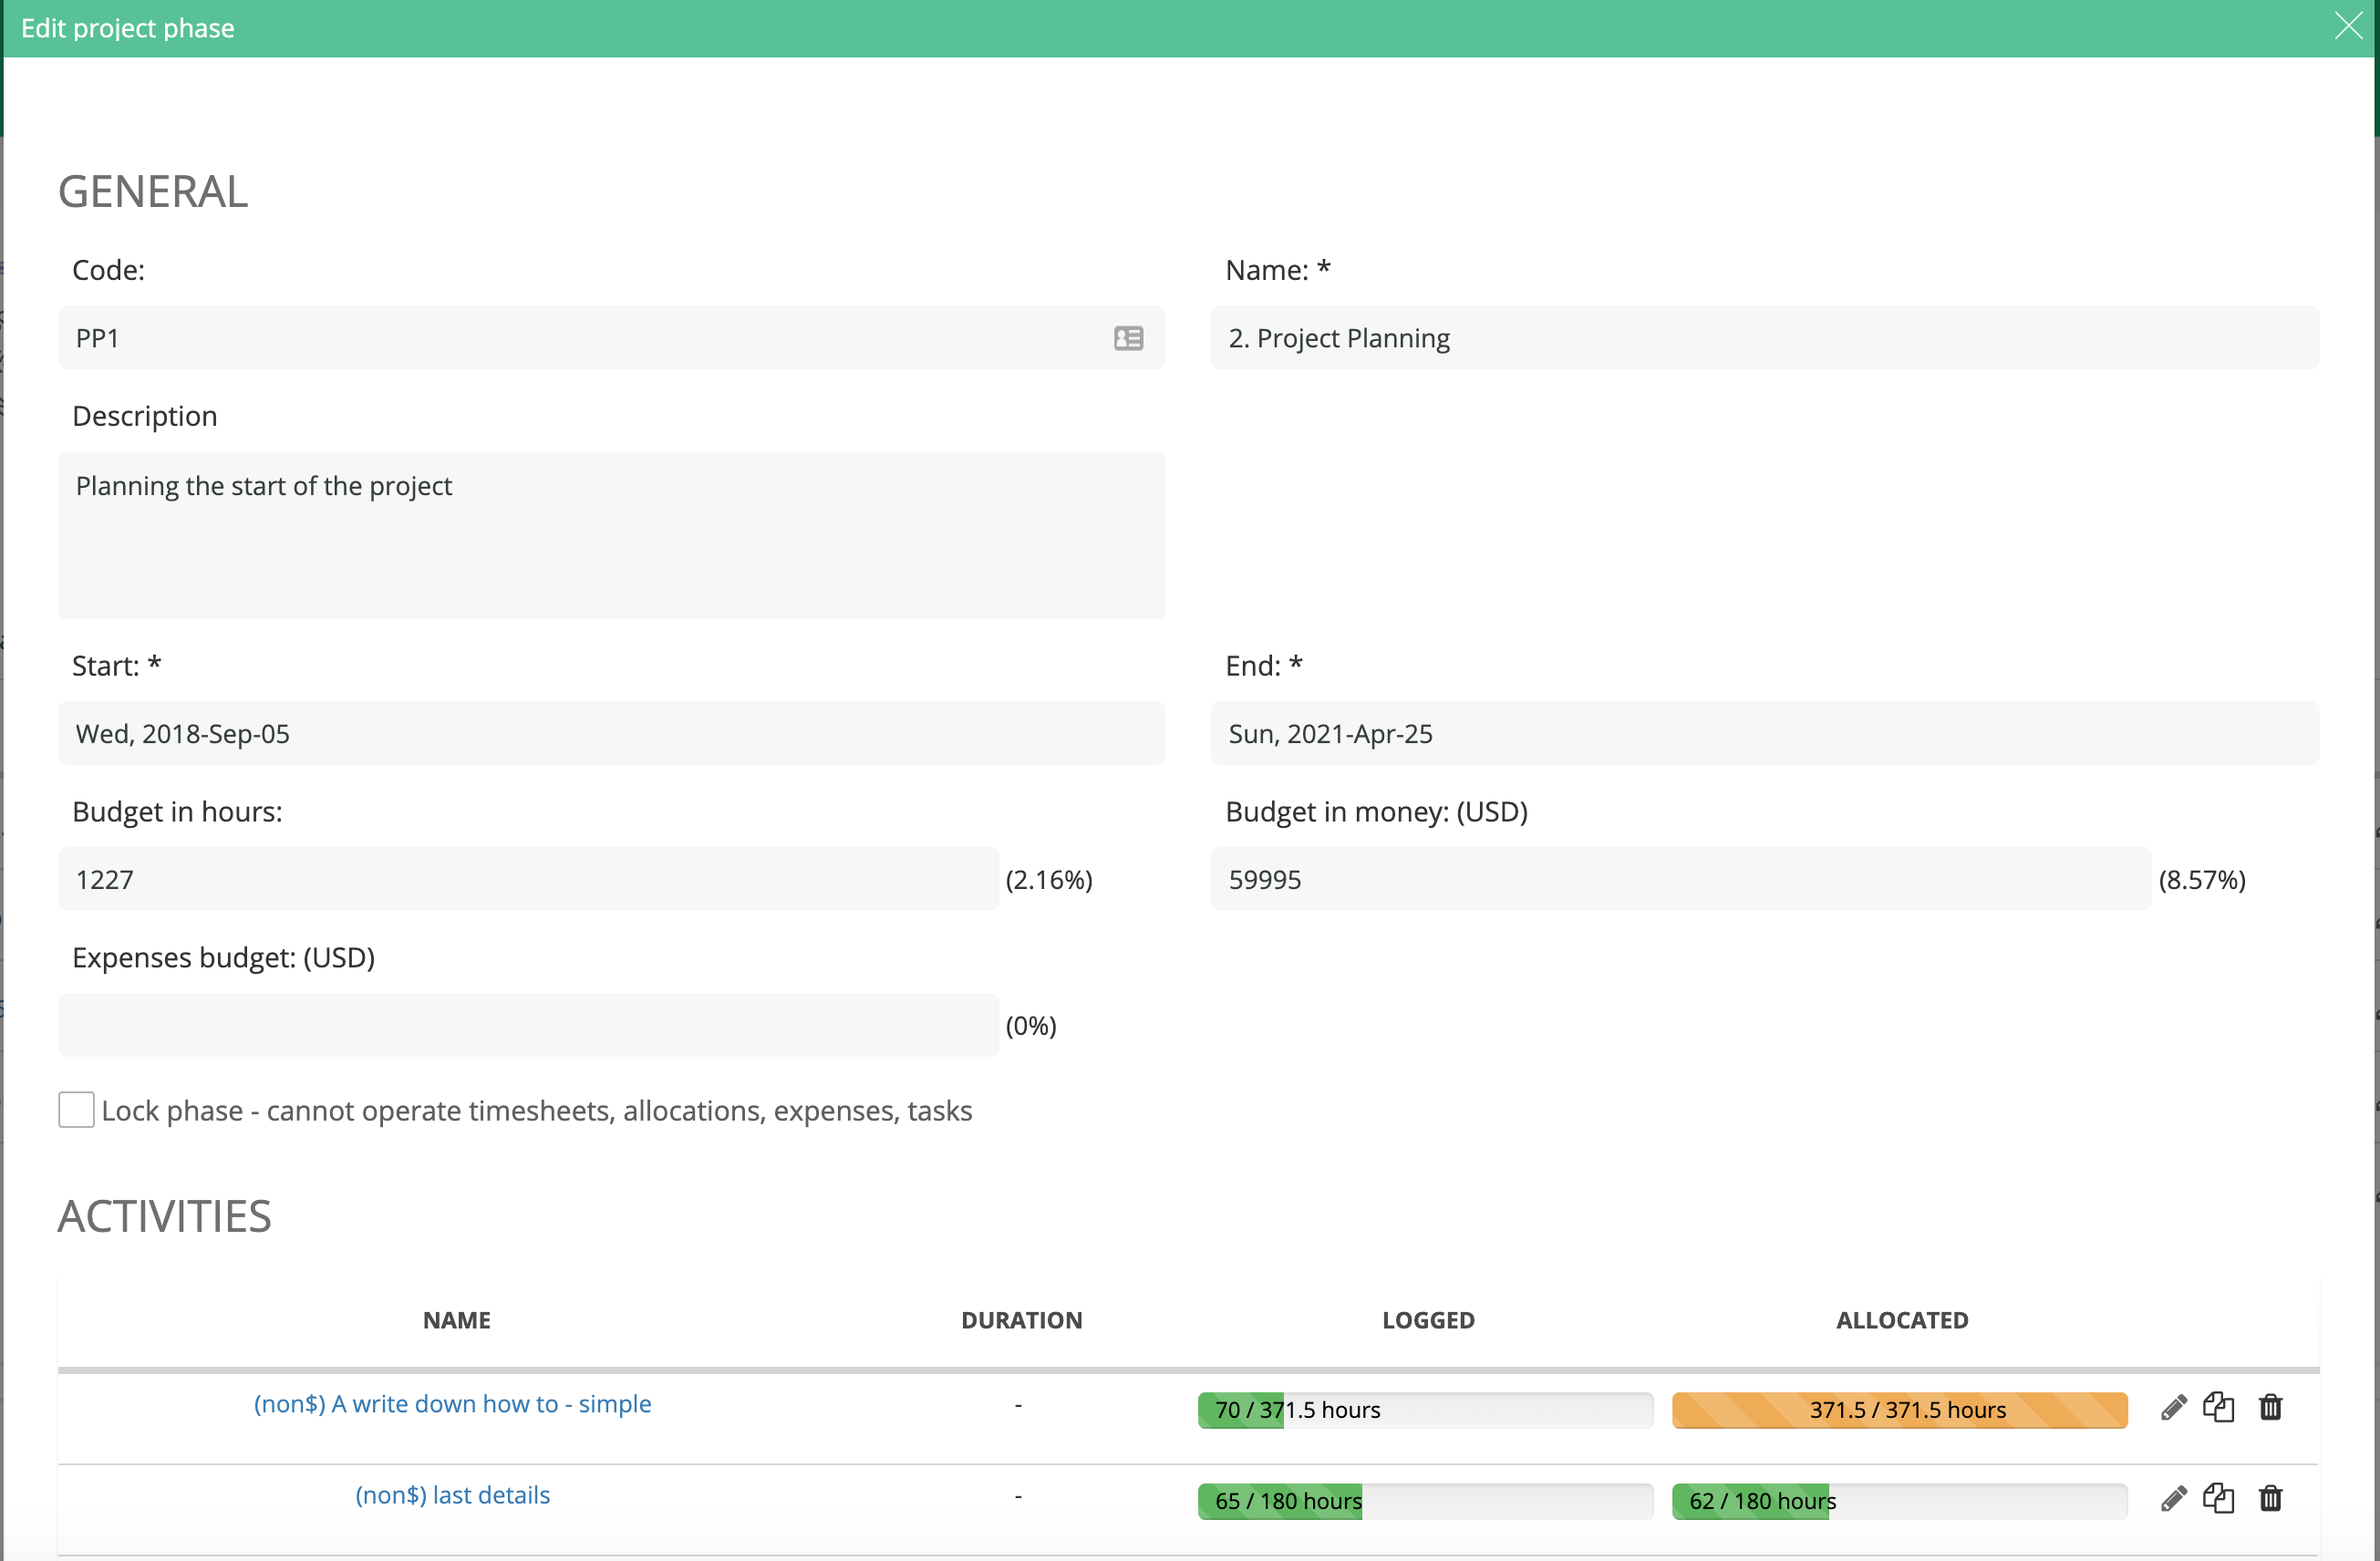
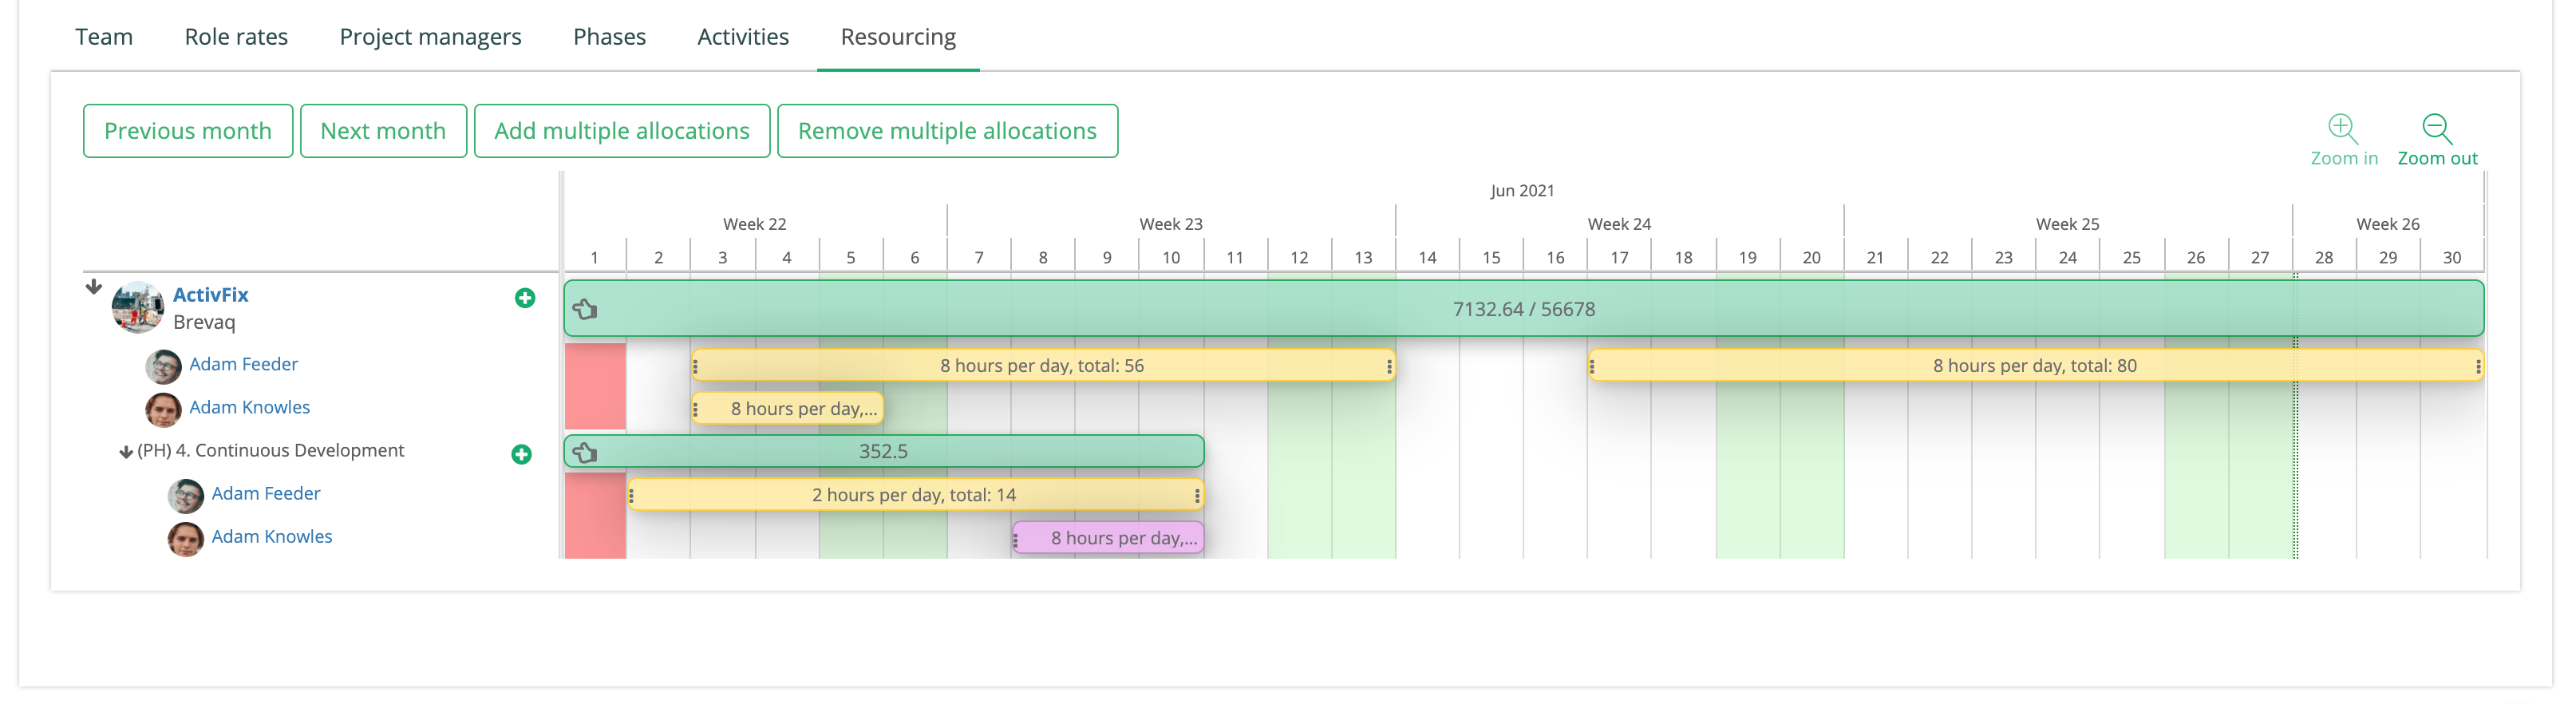
After creating the phases, you have a list of them with statistic bars that will give you quick information about the logged and allocated hours specifically on those phases/activities
The Activities are smaller repetitive “tasks” like meetings, training sessions, etc
12. RESOURCING
I would encourage you to use the Resourcing planner for the allocations, either People or Project view, BUT if you are interested in one specific project, you can check the allocations or add some new ones from the project page also